
Import of your existing contact information records is carried out through the Import Manager QImport, a desktop application that provides table loading, field cross-matching, import preview and modification and import or removal of imported records.
Click here to download the import program from your Home page in QwikTeam.
The import module provides import from your desktop Outlook Contacts folder or from a Microsoft Access or CSV database (to handle Goldmine, Act, etc.). CSV is a common output function of many contact managers. Some products output to text and permit designation of delimiters. Microsoft Access has several ways to import such text output.
For example, to import from Maximizer, click here.
Sections:
- I. Get the URL of your QwikTEAM installation
- II. Importing using a file exported from other applications
- III.Quick import from Outlook
- IV. Example - importing from Excel spreadsheets to an Access database, then to the central, online database
- V. Additional Outlook names you can set up
BEFORE YOU START IMPORTING:
I. Ensure the Import program knows the URL of your QwikTEAM installation
The desktop import program needs to know the URL of your online installation so that it can send the imported records to the database.
1. As you can see below beside Server, you need the URL of your QwikTEAM installation. It's easy to get. Enter your Company Number (get that from your administrator) and click [Retrieve URL].
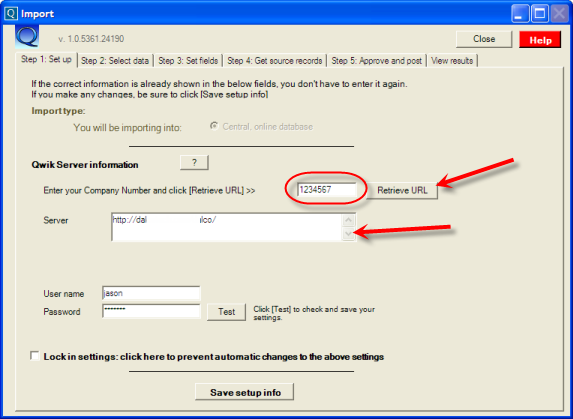
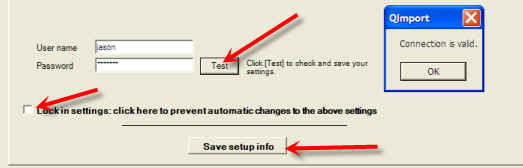
2. Once you've successfully retrieved the Server URL address, enter your user name and password and click [Test] to ensure your credentials are valid.
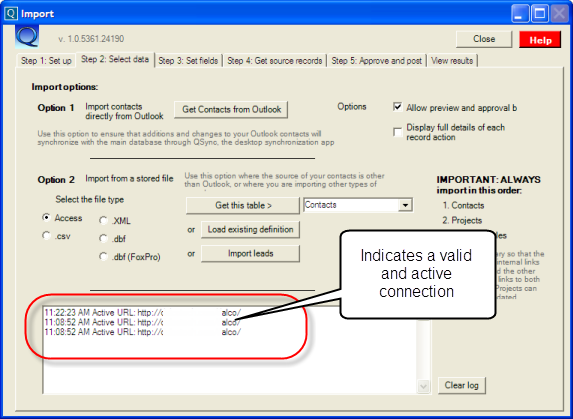
3. Click [Step 2. Select data] and check that the URL is connecting:
II. Importing using a file exported from other applications:
Now that you have successfully connected the Import Manager to your company, continue with the importing.
If you are looking for a quick import from Outlook, click here: III. Quick import from Outlook
The most common import format is .CSV, the comma-delimited format used by many applications, including most accounting systems, GMail and other applications. You can also export a .csv file from Outlook.
QImport supports that format and several others, so it's your choice to use whichever format is appropriate for the application you are exporting from.
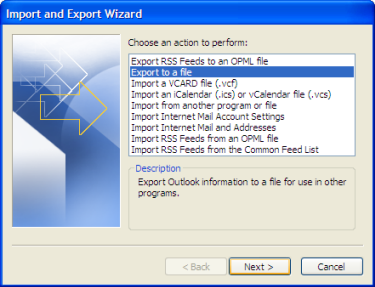
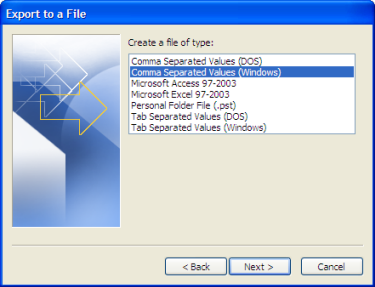
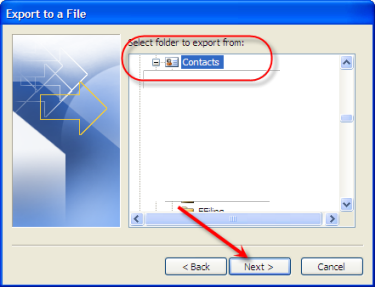
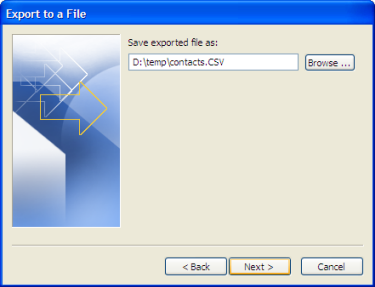
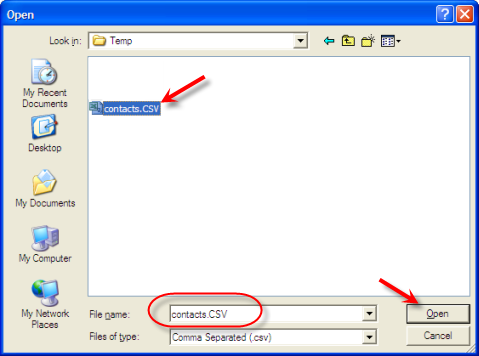
1. Output your source data in the applicable format to a location on your computer. We suggest the Temp folder as appropriate. Below is an example using Outlook:

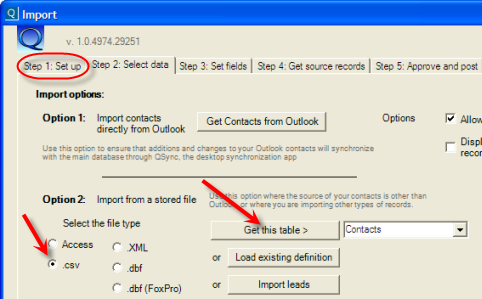
2. In QImport, under [Step 1: set up] > Option 2:, select the file type and click [Get this table >]:
3. When the Open dialog displays, move to and select the output file you created in 1. above:
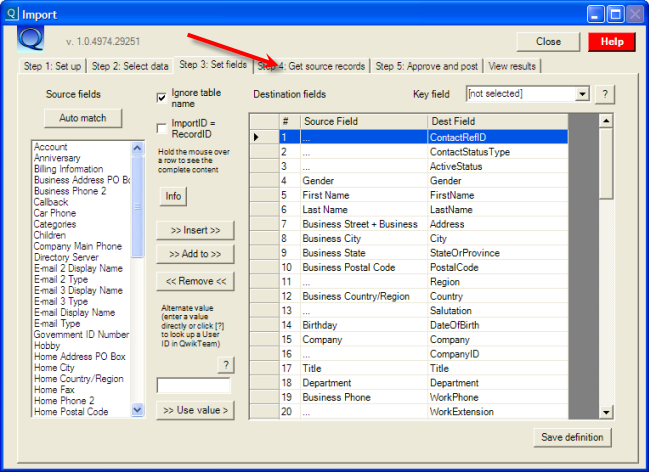
4. QImport will open the file and move to [Step 3: Set fields]. Click [Auto match] to have QImport attempt to automatically match the source fields to the QwikTEAM Contact fields.
5. Match the rest of the fields where applicable by selecting the field under Source fields then selecting the row containing the target field under Destination fields:

6. You can click [>> Insert >>] or drag/drop the field to add it to the Source field column or click [<< Remove <<] to remove the field from the Destination fields list.
7. After matching all the field names, we suggest you click [Save definition] so that you can easily return to QImport and bring up the same matching definitions later, if needed.
8. Click [Step 4: Get source records] to move to the next step:
9. Ensure the file path is correct. Click [Get] to locate the file if the one displayed is not correct.
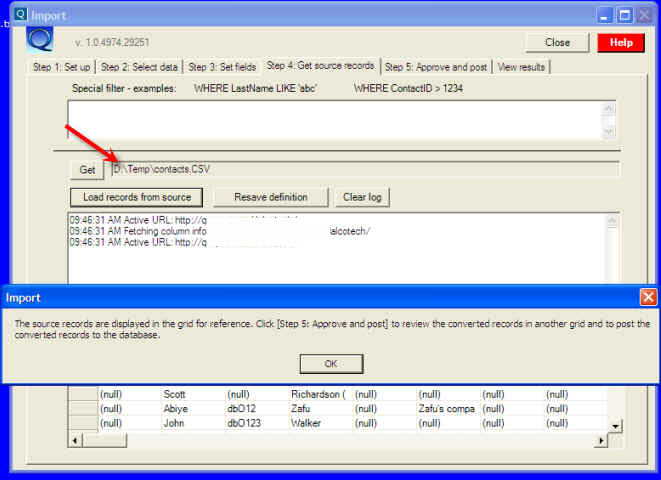
10. Click [Load records from source] to fetch the records. Review the list and click [Step 5: Approve and post] if all is OK.
11. The final list will be displayed:
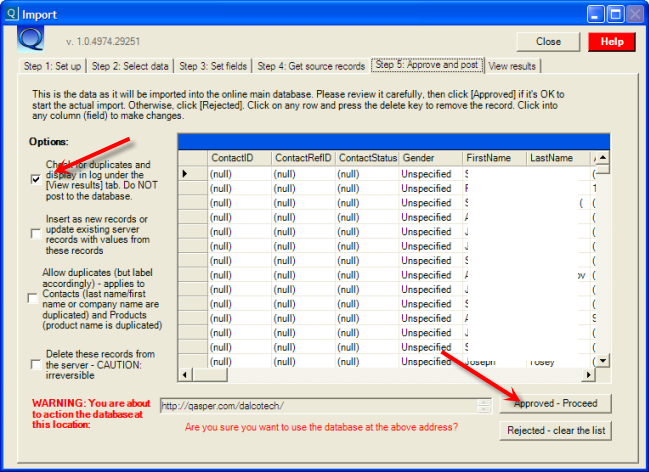
12. Click onto any row and directly modify any fields, if required. Click a row and press your Delete key to remove the row. Scroll to the bottom and add new rows.
13. Review the Options and select the appropriate choice. We suggest you select the option: Check for duplicates and display in log under... since that will display a list with any error information and won't actually post the records. You can then review the proposed output and go back and correct things like adding other source fields and changing destination fields.
Select the appropriate option:
a. "Update existing server records with values from these records" if you want to overwrite similar records on the target database.
b. "Delete these records from the server - CAUTION: irreversible" to delete existing records that match these records (applies only if the list of records has an import ID that can be matched on similar records on the target database). Note: we don't recommend this action unless it's absolutely necessary, and done close to the time the import took place.
c. "Allow duplications (but label accordingly ..." to permit duplicates to be stored on the target database. If this option is not selected, the display log will show which records have been rejected because a matching record was found on the target database. If this option is not selected, duplicate records will be clearly marked as "possible duplicates".
14. Click [Approved - Proceed] to cause the import. During the import a log will display progress. Records are imported in blocks of 10.
If you get a message about a key field not been chosen, you might want to go back to [Step 3: ..] and select a destination field that has a unique identity for each record.
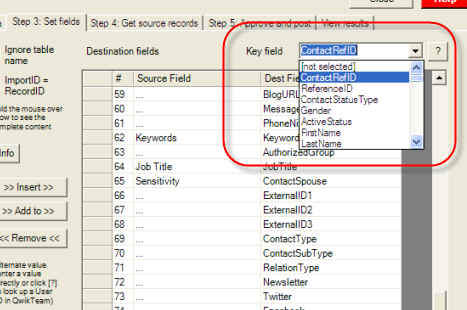
This is not mandatory, but will assist in identifying matching records should you later want to update the imported records from the same source. It's only worthwhile doing if there is a unique value in each imported record.
15. Click [Rejected - clear the list] if you don't want to import the records.
16. The results list will display under [View results].
17. If you have chosen to check for duplicates and not actually post the records, review the list under [View results] and go back to correct any issues identified there. For example, the list might show a possible duplicate. You would then review QwikTEAM's actual records as well as your source records and amend one or the other accordingly, or delete the proposed import record.
III. Quick import from Outlook:
(Skip this if you are going to export a file from Outlook or your chosen application for import into QwikTEAM. You can follow the instructions at II. Importing using a file exported from other applications: above)
QImport supports a single-click import from Outlook.
1. Before importing, we recommend you set up custom fields for any fields from Outlook that are not automatically part of the import Outlook.
The following Outlook fields are automatically handled and mapped to the central database's equivalent:
| Outlook | Equivalent | |
| FirstName | FirstName | |
| LastName | LastName | |
| CompanyName | Company | |
| BusinessAddressStreet | Address | |
| BusinessAddressCity | City | |
| BusinessAddressPostalCode | PostalCode | |
| BusinessAddressState | StateOrProvince | |
| BusinessAddressCountry | Country | |
| Note: if BusinessAddressStreet is blank and BusinessAddressCity is blank and BusinessAddressPostalCode is blank, the following 5 fields are used in place of them: | ||
| HomeAddressStreet | Address | |
| HomeAddressCity | City | |
| HomeAddressPostalCode | PostalCode | |
| HomeAddressState | StateorProvince | |
| HomeAddressCountry | Country | |
| BusinessTelephoneNumber | WorkPhone | |
| BusinessFaxNumber | FaxNumber | |
| Email1Address | ||
| Email2Address | EMail2 | |
| Email3Address | EMail3 | |
| HomeTelephoneNumber | HomePhone | |
| EntryID (internal cross-reference) | ImportID | |
| JobTitle | Title | |
| ManagerName | Manager | |
| MobileTelephoneNumber | MobilePhone | |
| NickName | MessageNickName | |
| WebPage | WebSite | |
| Categories | Category | |
| Sensitivity | Private | |
Click here to view some Outlook field names you might wish to add as custom fields.
2. Run Q Import.
3. Ensure Outlook is running.
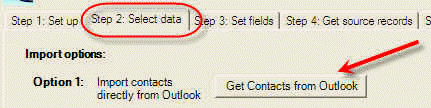
4. In Q Import under [Step 2: Select data] click [Get Contacts from Outlook]:
5. Import will access your Outlook contacts folder and assemble all the contacts, then display them under the tab:
6. Review the list, edit and make any changes you wish; delete any records you don't want imported, then click [Approved - OK to Post].

7. QImport will check to see which Options you've selected and will notify you if there are illogical choices.
CAUTION: be very aware of where you are importing the records to. The target database is shown at the bottom of the screen and you will be asked for confirmation - twice:
8. The import will complete and will display messages under the [View results] tab.
9. In the event you wish to delete all the records just imported, return to [Step 5: Approve and post, select the Delete these records from the server - .. option and click [Approved - OK to Post] again.
IV. Example - importing from Excel spreadsheets to an Access database, then to the central, online database
These instructions apply to Microsoft Excel 2003 and Microsoft Access 2002 but likely are similar for other versions.
The Excel spreadsheet needs to be converted to a Microsoft Access database. To do that:
1. Open Microsoft Access.
2. Select File > New, then select "Blank Database".
3. Give the database a File name, typically corresponding to the name of the spreadsheet you are going to import, but with the ".mdb" extension.
4. Click [Create].
5. From Access, select File > Get External Data > Import.
6. Select "Files of type:" Microsoft Excel (*.xls) and locate and open the Excel spreadsheet.
7. From the wizard, if the spreadsheet has more than one worksheet or range, select the applicable one and click [Next].
8. If the wizard offers the checkbox, "First Row Contains Column Headings" and the first row does contain column headings, select that option and click [Next].
9. When the table information is offered, select "In a New Table" and click [Next].
10. Skip the Field Options by clicking [Next].
11. Select a primary key if there is one, otherwise let Access add the primary key, and click [Next].
12. At the "Import to Table" dialog, name the table "contacts" and click [Finish].
13. Clear any import errors. The best way to clear errors is to open the spreadsheet in Excel and make changes then re-do the import.
After the database is complete, follow the import instructions at the top of this help page - click here.
V. Additional Outlook field names you can set up.
Only fields with these exact names will be synced. If you add any custom fields, they must be defined as text with recommended length of at least 50 characters.
Anniversary
AssistantName
AssistantTelephoneNumber
BillingInformation
Birthday
Body (description)
BusinessAddressCity
BusinessAddressCountry
BusinessAddressPostalCode
BusinessAddressPostOfficeBox
BusinessAddressState
BusinessAddressStreet
BusinessFaxNumber
BusinessHomePage
BusinessTelephoneNumber
CallbackTelephoneNumber
CarTelephoneNumber
Categories
Children
Companies
CompanyMainTelephoneNumber
ComputerNetworkName
CustomerID
Department
FileAs
FTPSite
FullName
Gender
GovernmentIDNumber
Hobby
Home2TelephoneNumber
HomeAddressCity
HomeAddressCountry
HomeAddressPostalCode
HomeAddressPostOfficeBox
HomeAddressState
HomeAddressStreet
HomeFaxNumber
HomeTelephoneNumber
Importance
Initials
InternetFreeBusyAddress
ISDNNumber
JobTitle
Journal
Language
ManagerName
Mileage
MobileTelephoneNumber
NetMeetingServer
NoAging
OfficeLocation
OrganizationalIDNumber
OtherAddressCity
OtherAddressCountry
OtherAddressPostalCode
OtherAddressPostOfficeBox
OtherAddressState
OtherAddressStreet
OtherFaxNumber
OtherTelephoneNumber
PagerNumber
PersonalHomePage
PrimaryTelephoneNumber
Profession
RadioTelephoneNumber
SelectedMailingAddress
Sensitivity
Spouse
Subject
Suffix
TelexNumber
TTYTDDTelephoneNumber
UserCertificate