
Import of your existing contact information records is carried out through the Import Manager QImport, a desktop application that provides table loading, field cross-matching, import preview and modification and import or removal of imported records.
Steps:
1. Run Maximizer and open the desired address book.
2. Select File > Export Address Book Entries.
3. Select the Comma Separated Value (*,) format.
4. Click [Browse] and browse to a suitable folder to contain the exported database. Suggestion: \temp (if it's available).
5. After moving to the suitable folder, type a name for the file in the File name: box. Suggestion: contacts_maximizer.
5. Click [Save] to return to the export dialog.
6. Click [OK] to display the Select Fields for Export dialog.
7. Select a field name on the left, click [Add ->] to move it to the right list area. Ensure you move the field only once. Suggestion: move all the fields.
8. Click [Export] to complete the process. This will create a database file in the destination folder on your computer named contacts_maximizer.csv.
9. Check the output folder to ensure a file was created.
10. Close Maximizer.
Importing from the CSV file database into the main online database
1. On your desktop, select Start > Programs > Dalco > QApps > QImport Import Manager to start the import program.
2. Ensure QImport knows the online URL to insert the data into.
The desktop import program needs to know the URL of your online installation so that it can send the imported records to the database.
To do that:
a. Log into your QwikTeam Home page.
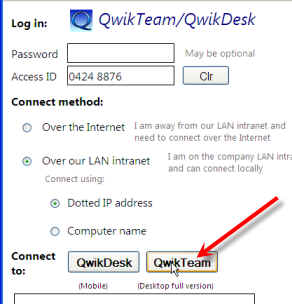
Typically, you do that by logging into http://qwikrelay.com and entering your Access ID, then selecting (.)Over our LAN intranet and (.)Dotted IP address and clicking [QwikTeam].
b. Or, you might have the URL already saved on your desktop. Either way, bring up your Home page and copy the URL:
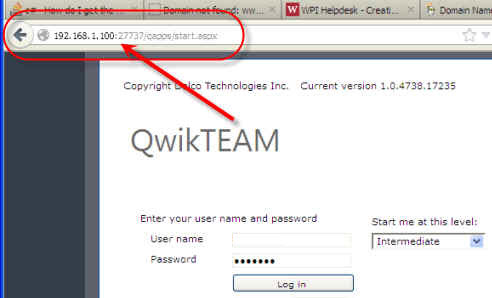
c. Copy and paste that URL into the QImport Web URL:
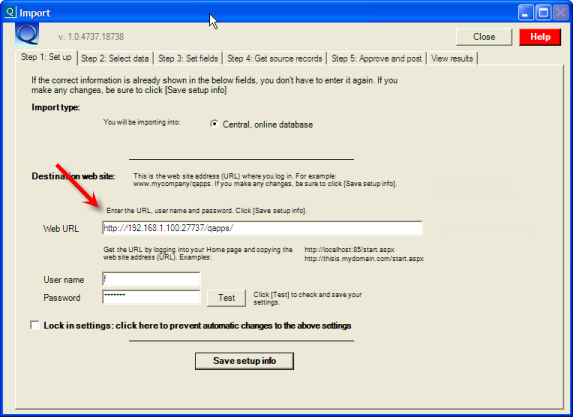
d. Enter your user name and password, then [Test] and click [Save setup info].
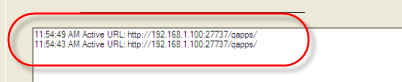
e. Click [Step 2. Select data] and check that the URL is connecting:
2. Under Option 2. of [Step 2: Select data] ensure the .csv option is selected.
3. In the table drop down list [Get this table >], it should show Contacts. If not, select Contacts from the list.
4. Click [Get this table>] and move to the output folder you used when creating the .csv Maximizer file. If you used the suggestion, it will be named contacts_maximizer.csv.
5. Select and [Open] the file.
6. QImport should load the file and display [Step 3: Set fields:
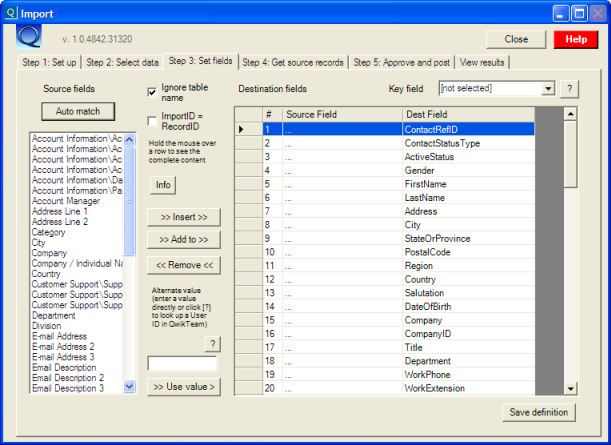
7. Select the fields one by one from the Source fields list and either drag them across and drop them on their equivalent in the Destination fields list, or click the destination field and click [>> Insert >>]. Here's a list of suggested matches:
| Qwik destination | Maximizer source |
| Gender | Mr/Ms |
| FirstName | First Name + Middle Name (note 1) |
| LastName | Last Name |
| Address | Address Line 1 + Address Line 2 |
| City | City |
| StateOrProvince | State / Province |
| PostalCode | Zip / Postal Code |
| Country | Country |
| Salutation | Salutation |
| Company | Company |
| Title | Position |
| Department | Department |
| WorkPhone | Phone 1 (note 2) |
| WorkExtension | Phone 1 Extension |
| HomePhone | Phone 4 |
| MobilePhone | Phone 2 |
| FaxNumber | Phone 3 |
| E-mail Address | |
| Email2 | E-mail Address 2 |
| Email3 | E-mail Address 3 |
| WebSite | Web site |
| Comments | Notes (All) |
| Manager | Reports To |
Note 1: You can concatenate fields from the source into a single field in the destination by selecting the field in the Source fields list, clicking on the destination field location, then clicking [>> Add to >>]
Note 2: You may have a different arrangement for the various phones. For example, Phone 1 in Maximizer might be a home phone. Adjust your field selections accordingly.
The above are just suggestions. You can change/add/remove as needed to fit your specific configuration of Maximizer.
8. Important: click ![]() [Save definition] to save your definition in case you want to use it
again.
[Save definition] to save your definition in case you want to use it
again.
9. Click the tab [Step 4: Get source records]. Add any filters if needed (see the section below Step 4 for more information).
10. If the path and file name of the database is not correct, click [Get] to move to the folder where the .csv file database was saved and select and load the file.
11. If the path and file name of the database was not correct and you moved to the correct database, click [Resave definition].
12. Click [Load records from source]. If an error occurs, ensure that the path and file name are correct, then click [Resave definition] followed by [Load records from source] again.
13. The tab [Step 5: Approve and post] will display the records that are going to be imported.
14. Review the list, delete any rows you don't want imported.
15. Test the import by selecting the Check for duplicates and display in log .... checkbox, then click [Approved - Proceed].
QImport will go through a complete check of the source contact records against the destination database and will show each record in a list, identifying those that might be duplicates.
You don't have to delete possible duplicates, but it makes for a cleaner database.
16. After reviewing the list and removing any duplicates (by clicking the [Step 5: ...] button, clicking on the undesired record's row and clicking the keyboard delete button):
a. Unselect Check for duplicates and display in log .... checkbox,
b. Select Insert as new records or update existing server .... checkbox.
c. If you want to allow duplicates and have them labelled clearly, select Allow duplicates (but label accordingly) .... checkbox.
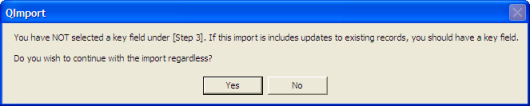
17. Click [Approved - Proceed] and read and approve the dialogs that follow to commence importing.
You can likely click [Yes] to bypass this dialog if it displays:
18. Review the list after import and if everything is OK, close Q Import.
Note: you can delete all the records you imported should that be necessary. In [Step 5: Approve and post], select the Delete these records from the server .... checkbox and proceed.