
QwikTEAM provides more comprehensive and extended functionality than QwikDESK and is generally used by the sales and service teams.
QwikTEAM typically runs on a desktop/laptop computer, although it's quite comfortable on tablets. Some modules (like administration) are not available on mobile devices.
If you haven't done the QwikDESK Quick Start, we suggest you do that before the QwikTEAM Quick Start, to see if you need QwikTEAM in your day-to-day activities.
Log in and try the demo:
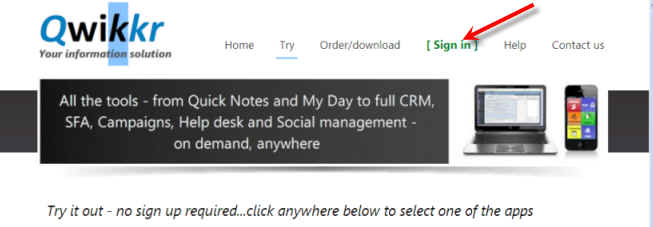
Click here - http://dalcotech.com/try.html - and click [Sign in]:
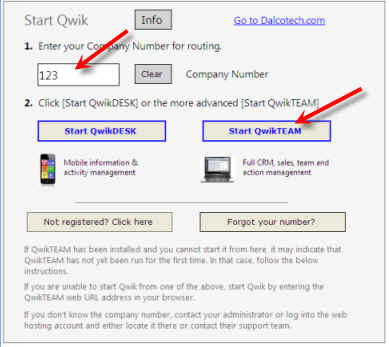
The Demo Company Number is 123. Select [Start QwikTEAM]...
Sections
- I. Highlights
- II. Navigating
- III. Modules
- IV. Communicators
- V. Quick View (10 to 20 minutes)
- VI. Extended View
- VII. Some interesting features
I. Highlights
QwikTeam, as a web-based environment provides a 20+ module, on-demand software solution designed for small and medium size businesses, and workgroups within large corporations to record, link and manage information, from contacts and connections through opportunities, projects and trouble tickets to documents, activities and actions, catalogs and orders.
Included is not only a complete CRM solution, along with extensive marketing tools to provide full Customer Experience Management but further many modules that accommodate collaborative information creation and management.
There is extensive communication functionality to ensure accurate communication and recording originating internally and externally.
There are modules that tap into social environments and the low annual licensing fee ensures everyone in the company has access to a complete set of tools.
• Single price, unlimited user annual license, less than $300
• Choice of independent host providers (customer-managed or assisted by us) or self-hosting
• Customer’s choice of hosted servers at less than $200 annually
• Client side data mirroring – no downtime
• Complete ownership, control of and access to the database
• Data not commingled with other companies’ data
• Fully customizable down to the field level
• Quick 4-step add-in process for 3rd party modules
• Synchronizes with Outlook for email, appointments and contacts
• Fully scalable, runs on the Microsoft .NET platform
• Tested with SQL Server, SQL Server 2005 (free) and MySQL (free)
A note regarding navigating: there
is a Quick menu window that can float on your desktop and be set to display each time you go to the Home page. It’s not
mandatory since there is also full menu access from all modules.
However, it can be used to quickly jump to various modules (and, by the way, it’s customizable though
the XML-based menu system).
If the menu doesn’t automatically display and you want to use it:
1. Click [Preferences] from the Home page.
2. Select the option “Show search panel?”
3. Click [Save preferences].
Thereafter, when you go to the Home page, the menu window will display.
III. Modules
The public access site is http://dalcotech.com/qorganizer/start.aspx, and it has a dropdown list of suggested logins.
We suggest Dan as a login name, since most of the linked and action records were created using that login ID.
Because this is a demo, it may be time-restricted and could time out after an extended period of inactivity, requiring login again. Also, the number of users is restricted to 50. Any action (like moving to another page) will avoid timing out.
IV. Communicators
Before we get started, we’d like to discuss how communication is
enabled in this new information world, particularly with regard to social networks and CRM
(Customer Relationship Management) in social environments.
Significant Social CRM
functionality is provided by empowering users to connect
outwardly with social environments and capture important information, as well as
by enabling interested outside parties to connect inwardly with users,
Several techniques are employed to communicate outwardly and internally, and to allow others to communicate into the environment. These are important functions in the world of social networks and search environments.
There is a complete outbound email system with several entry points (Activities, Contacts, Orders, Documents, etc.). Inbound emails sync into the central database through Outlook and emails are auto-attached to their destination contacts.
Chat
A complete internal chat system.
Messaging
Essentially, a “quick email” system. Send messages, respond to them, clone them into action records.
Live Chat
Setting up Live Chat on your web site enables anyone to communicate live with users. One line of code on your web page and it’s enabled.Web capture
Capture any type of information from one or more pages on your web site, including names and addresses, comments, registrations, etc. The captured information creates an ‘in-process’ contact record as well as a sales/service callback record.
Help desk
A central location for all inbound inquiries, complaints, calls and so on.
Widgets (requires popups to be allowed)
Search, analyze and pull back all types of information through Google, Wikipedia and others.
V. Quick View (10 to 20 minutes)
After going through this Quick View, follow up by reading through VI. Extended View and VII. Some interesting features. These latter two sections give more tips and details on various modules and functions. After completing all the sections, you'll be ready to work confidently.
All 3 sections shouldn't take more than 1 1/2 hours to complete and we strongly urge you to study them all.
Note about pop ups
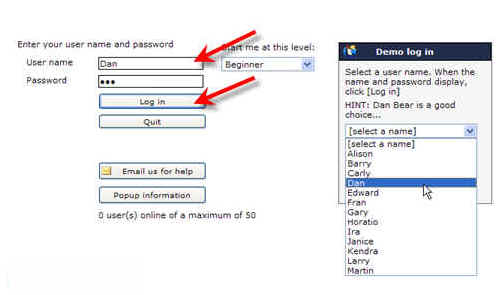
Popups are employed in various modules (Visualizer, Calendar, Query Builder, Widgets). You need to allow popups to view those modules.Log in at http://dalcotech.com/qorganizer/start.aspx
Select Dan from the dropdown list and click [Log in].
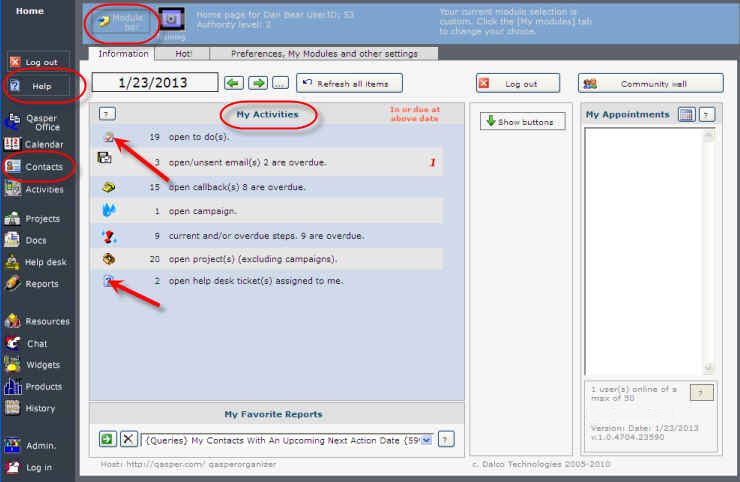
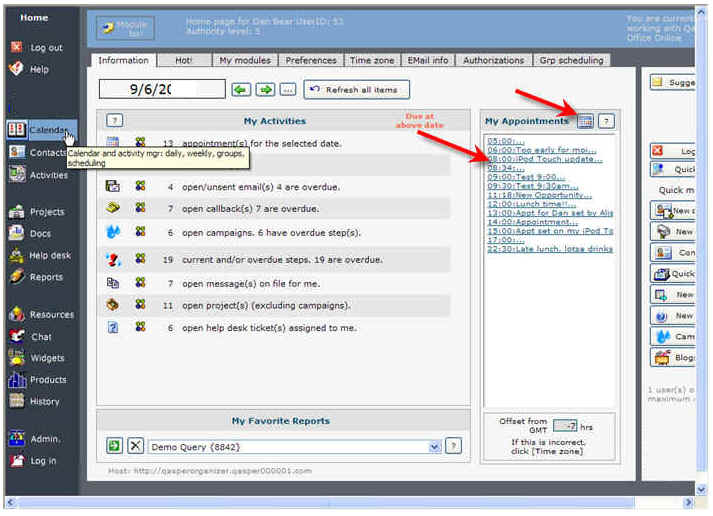
Home page
After logging in, have a quick look through the Home page. Check the Help page by clicking [Help] in the upper left corner of the left-side menu. The Home page is your information center.
The left-side menu is also called the Module bar and you can have it either automatically slide in and out on mouse over or permanently display by clicking [Module bar] in the top area of the Home page.
You might be starting in the Beginner mode. A welcome screen will display with some information on how to control the Module bar and add more modules to your Home page.
Note the various items under “My Activities”. This provides a quick look at important information. You can bring up the details by clicking on the small icon on the left-side of any row.
If there are any activities, there will also be a square, colored 4-node button to the right of the icons that will launch the Visualizer.
The Visualizer is described later…On the Home page, [Help] is on the upper left area of the left-side menu. Click [Help] for more information.
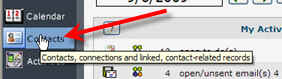
Contacts
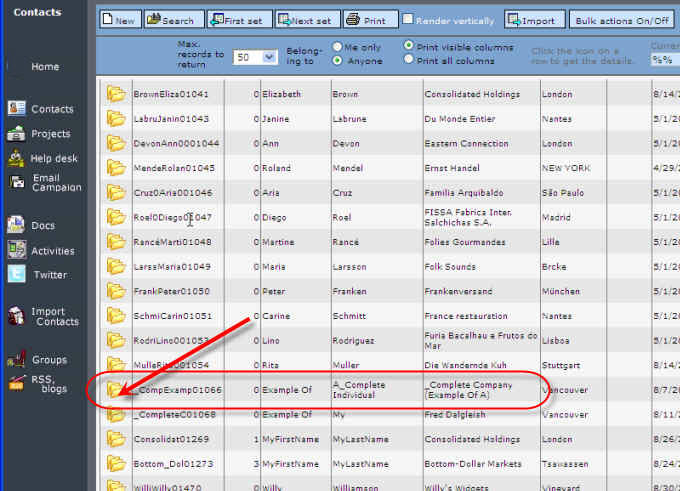
From the left-side menu, click [Contacts] to display the Contacts list.
If it hasn't been changed in Home page preferences (Default contact search field), the list will display in Last Name order.
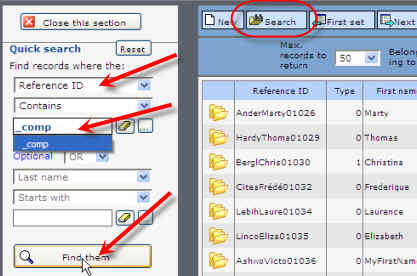
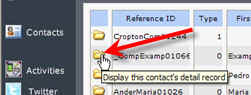
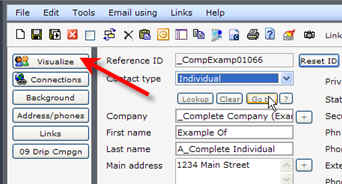
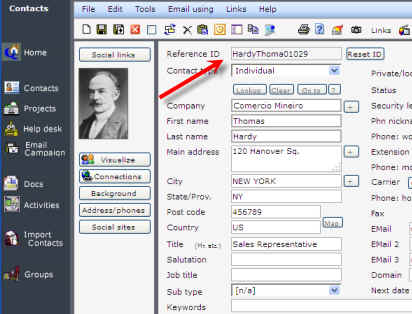
Scroll down the list and locate the record with Reference ID "_CompExamp01066"
If it's difficult to locate, click [Search] to open the Quick search panel (standard throughout all modules) and search for the contact record with that Reference ID.
In the list, you should see a row with the Reference ID of “_CompExample01066”. Click the little yellow folder icon on that row to open that contact’s detail profile.
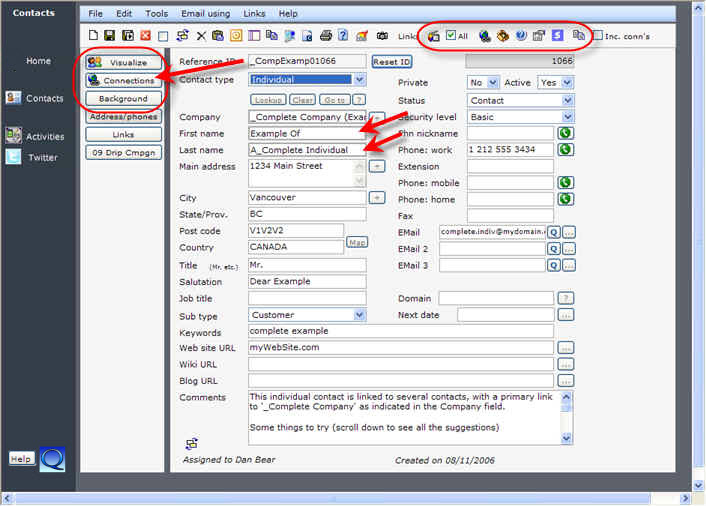
When the contact detail record displays, take a minute to look at the Menu options at the top and mouse over the various buttons on the toolbar to see the options available. Each of the buttons should display a small information box if the browser window is selected. That’s indicated by a darker title section at the top of your browser.
Browse around the displayed contact. There are many “fields” (boxes for information), but only a few are required if you want to keep it simple – (a Business selection under Contact type requires a business name; an individual requires a first and last name, and a few others).
The buttons in the left panel ([Visualize], [Connections], [Background], etc.) are not critically important at this stage, but go ahead and click [Background] to see how these panels are handled.
On modules other than the Home page, [Help] is on the bottom left area of the left-side menu. Scroll or enlarge the screen if it's not visible. Click [Help] for more information.
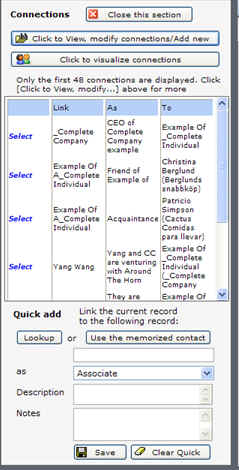
Connections – “6 degrees of separation”
Click the [Connections] button from the contacts detail page. This opens the Connections panel and shows the direct connections set up for the contact.
This is how various contacts are linked together – by the fact that they have something in common. Connections could be employees of a company, suppliers to the company, relatives, friends, business associates, etc.
You will also be able to visualize all the connections using the Visualizer (more on this a bit later).
Contacts drill-down
Typically, you start at the contact detail profile and access all its related records from there.
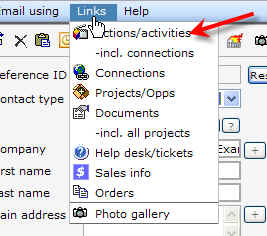
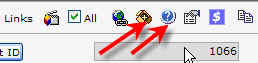
For example, you can click to access everything linked to that contact, from activities, emails, to dos and other action records, to help desk tickets, projects and files, documents, orders and more. Click the “Links” menu selection or mouse over any of the buttons on the button toolbar that you see after the word “Links” on that toolbar.
The ability to view all these linked records from the contact is called “drilling down” – seeing more detail.
From contacts you can “drill down” to all of a contact’s linked information records (records “owned” by the contact): activity/action records, Projects, Help Desk, Documents, sales records and orders. In some cases, when you get to one of those drilled-down records, you can further drill down to other records linked to the drilled-down record.
If you aren’t still at the Mr. “Example Of _Complete Individual” record, go back to that record from the contact list or from the Home page to [Contacts].
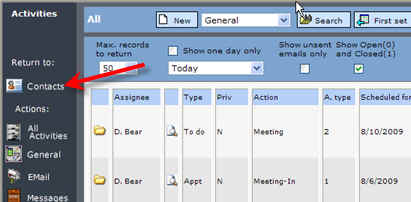
From the contact detail, select Links > Actions/Activities or click the Activities button on the toolbar (the “action” button to the right of the word ‘Links’ on the bar) to view all connected activities.
After the Activities list displays, click “Return to” [Contacts] to go back to the contact.
Back at the contact, select the menu items Links > Projects/opps and Links > Help desk or click the Projects or Help desk buttons on the toolbar (located a bit to the right of the Activities button).
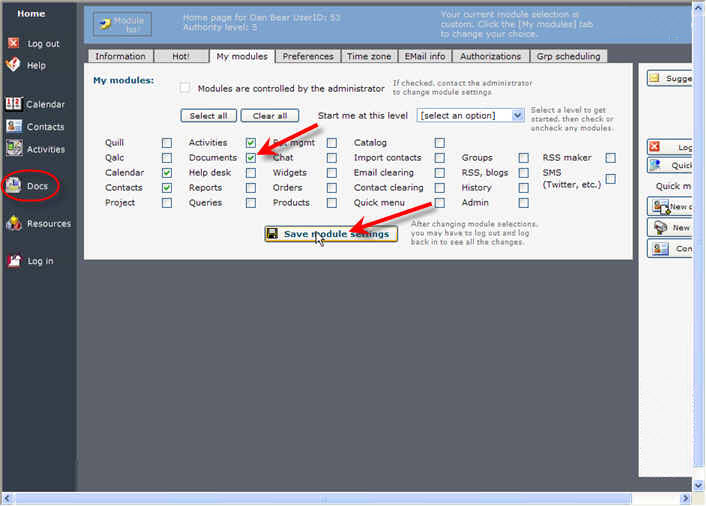
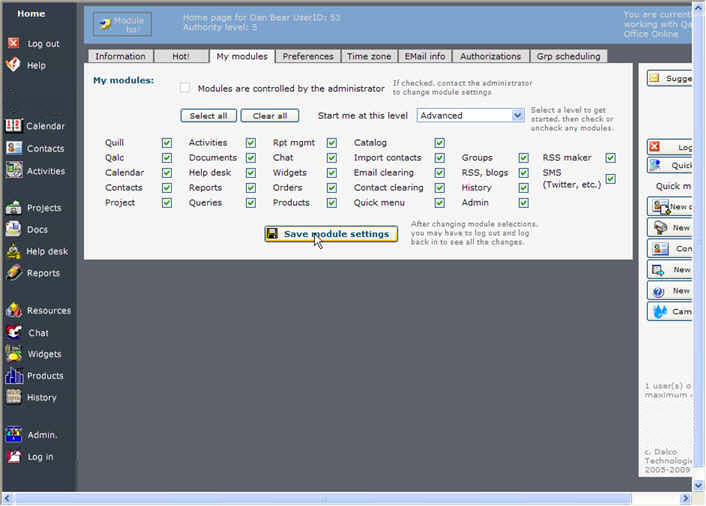
You might get an error message that "the requested module is not activated for you. Click the [My modules] tab on your Home page to review" and you will be returned to the Home page:
1. Click [My modules].
2. Click [Select all] to choose all the modules. Click [Save module settings].
3. Click [Contacts] from the left-side menu to return to the Contacts List view.
4. Locate and re-open the contact detail record you were on.
From the Contacts detail page, you can check out Docs and Orders as well.
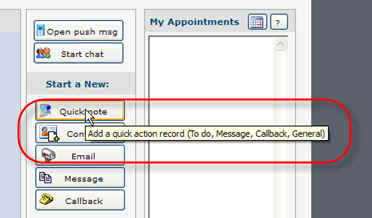
Quick Note
A super feature is the availability of Quick Note throughout almost all the modules:
Quick Note allows you to create any Activity or Action from a pop-up. It's very handy and, because it's always at hand, you can use it to capture information when you are browsing the Internet, or to quickly set up reminders or appointments.
For example, on the Home page, click the [Show buttons] button if there are no buttons showing beneath it:
From the buttons list, click [Quick Note]:
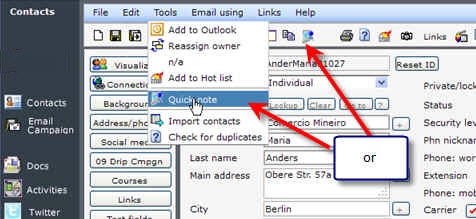
On other modules, the Quick Note is usually accessed by clicking the Quick Note icon on the top icon bar. For example, here's a contact profile:
The Quick Note looks like this. This one was created from clicking in the Contacts module, so it automatically fills in the owner information as being the contact itself:
Fill it in as you need...
Play with it. Create a couple of different Action types, save them and check them out in the Activities list and on your Home page.
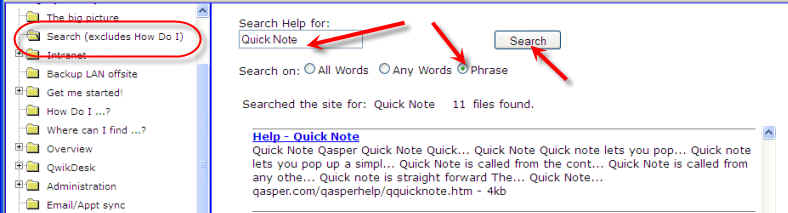
Help for Quick Note:
We are still documenting this feature, but you can find some information this way from the Help file - search for 'Quick Note' (without the quotes, of course) as a Phrase by clicking [Search]:
ActivitiesA key function that you will be using throughout the day is the Activities module. This module lets you create emails, add To Dos, create general Notes, add callbacks and more.
From the Home page, click the [Activities] button on the left-side menu to take you to the Activities module.
When the list displays, it will show all the activities. You can immediately narrow the list by clicking on a specific activity type in the left-side menu.
Click on [To do] to display a more limited list:
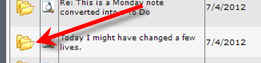
Click on one of the folder icons in the first column of the list to display the details of the selected To Do:
You can see that there are a lot of elements to an activity record:
To get your feet wet, let's create a new To Do record.
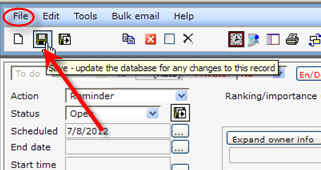
Select File > New from the top menu, or click the New icon:
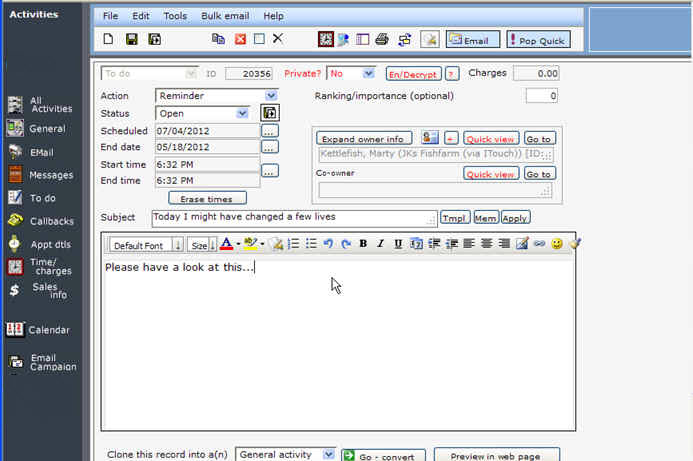
The new record has some default value in it. For example, it's automatically assigned to you, it has a Scheduled date, the Action type is set (Reminder) and Status is Open.
The minimum you need to enter is a Subject and some notes, then select File > Save or click the Save button:
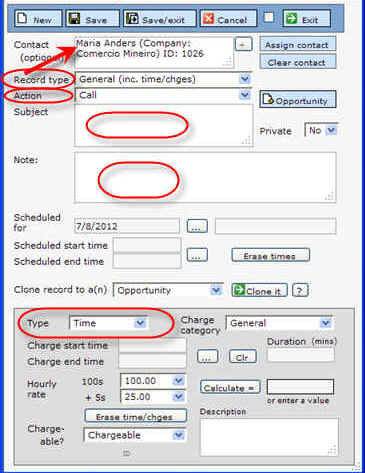
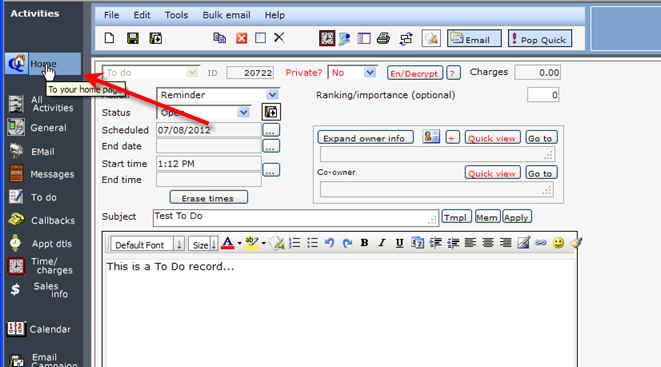
You can enter other information as you wish, including Scheduled/End dates, Start/End times. You can assign an contact owner record to the To Do. You can click the Time icon to enter time/charges.
But for now, just save the To Do with a subject and some notes.
All the Activity types are basically structured the same way, but, of course, each has its own unique elements as well.
Have a look at your To Do list by clicking the [Home] button on the left-side menu:
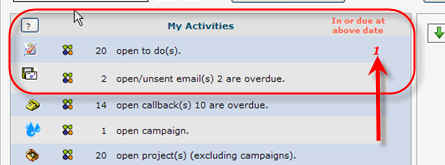
On the Home page, if your To Do was dated for today, it will show "In or due at the above date" of 1:
Now click the Check icon at the left end of the open todo(s) list:
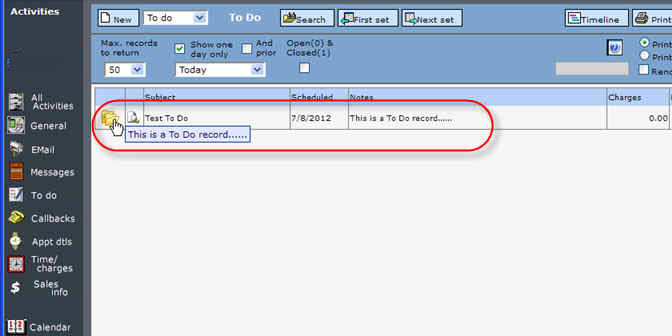
The list will display and you should see your To Do record.
You can click the folder icon to bring it up, view, change or delete the To Do.
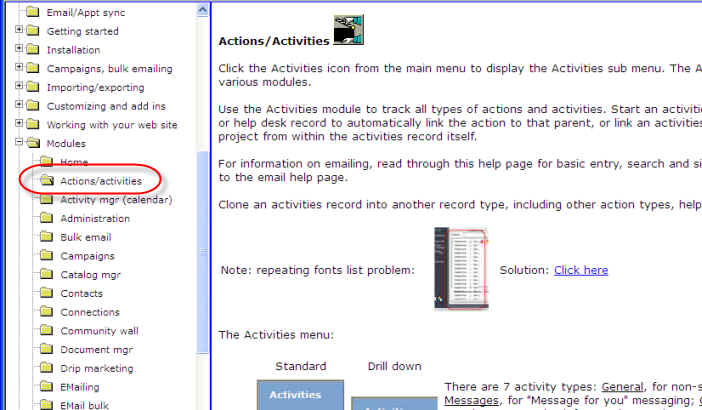
This just scratches the surface of Activity records, so you should play with various types, and read more in the Help file about them (look under Modules > Actions/activities). You can open the Help file from any module. It's typically in the bottom left corner of the left-side menu. You might need to scroll down to see it.
(Exception: The Help button is in the top area of the left-side menu when you are on your Home page)
Documents
From the Home page, click [My modules] and ensure the checkbox for ‘Documents’ is selected and that [Save module settings] has been clicked.
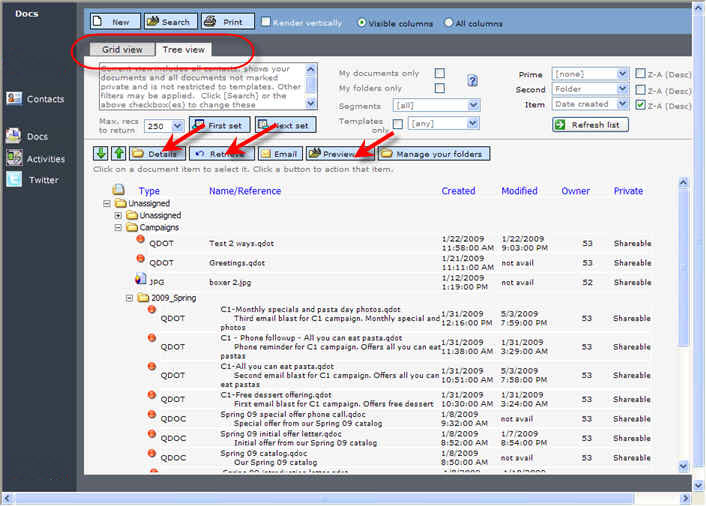
Click either [Docs] or [Resources] then [Doc Mgmt] in the left-side menu.
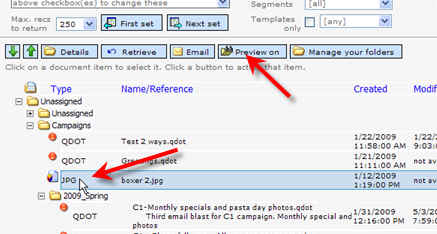
You will quickly see the logic of the documents module. There is a grid view and a tree view. You can preview documents, download them, view the details and/or email them.
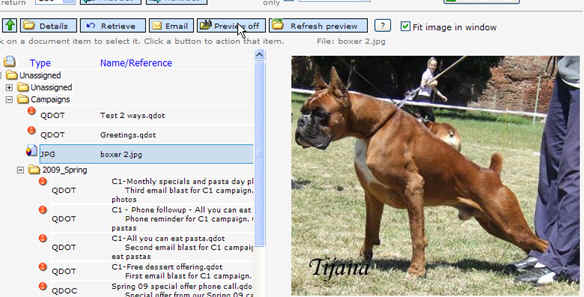
If you see a .qdot (prepared in Quill) or a .jpg, click on it, then click [Preview on] to display it in preview mode. When preview is on, click the [?] button beside [Refresh preview] for a quick guide.
If you have accessed Documents from an owner module (like Contacts), there will be a return button on the left-side menu and you will see only the documents connected to that owner.
Projects
From the Home page, click [My modules] and ensure the checkbox for ‘Project’ is selected and that [Save module settings] has been clicked.
Click either [Projects] or [Resources] then [Projects] in the left-side menu or floating menu.
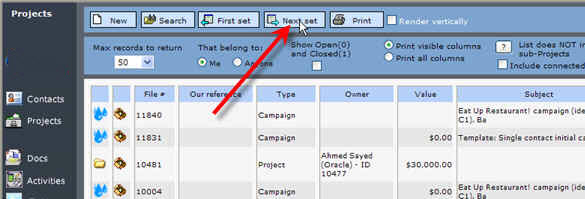
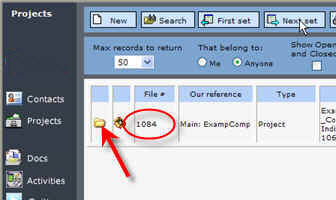
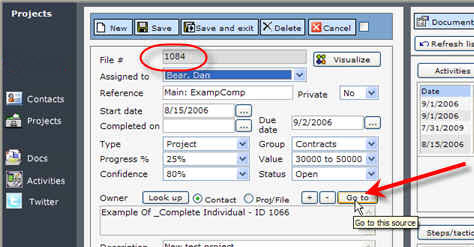
If it’s there, from the list view, select File # 1084 – Reference COMPEXAMP1. you might have to click [Next set] in the top area to view more projects.
If it’s not there, try this:
a. It may have been closed, so select the checkbox ‘Show Open(0) and Closed(1)’ in the top area to see if it appears.
b. it may be assigned to someone else, so select the option ‘That belong to: Anyone’.If you need to search, click [Views], select File # (ID) “starts with” and enter 1084 then click [Find them].
If you still cannot locate it it's OK to work with any other record.
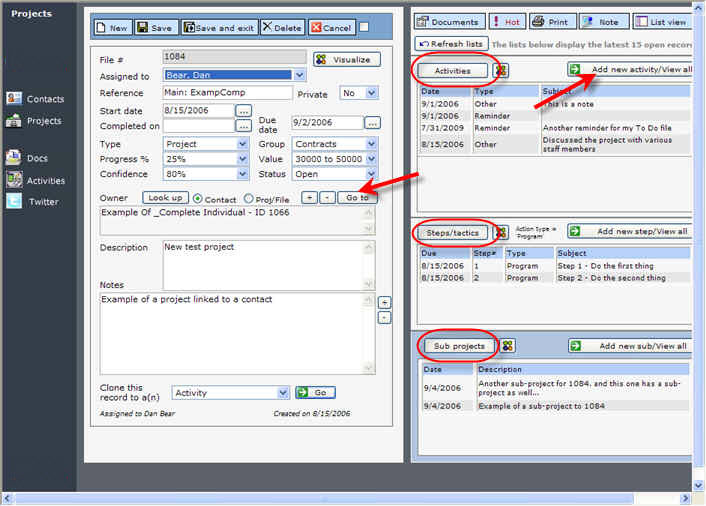
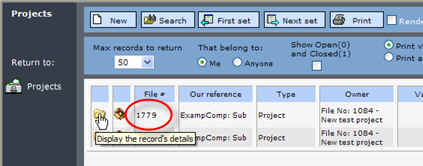
Display the record’s details by clicking on the small folder icon on its row.
When the detail record displays, have a look at the connected information records displayed in the sections on the right side: Activities, Steps/tactics and Sub Projects.
Click any of the [Add new …] buttons to view the linked records.
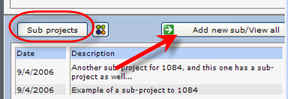
Click the [Add new sub/View all] Sub projects to view the projects linked to this project.
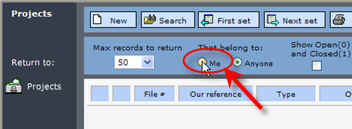
If nothing shows when the list view displays, ensure the option ‘That belong to: Me’ located in the top area of the screen is selected.
From that list click the yellow folder for File # 1779 to display it. Note that it has a sub-project as well.
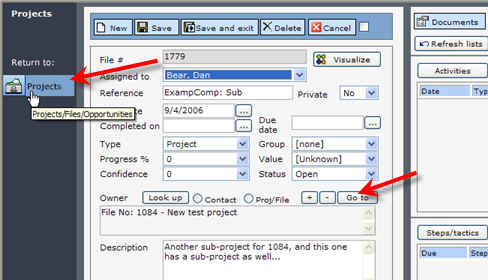
You can roll back up the links by clicking the “Return to” [Opps/Projects] button in the left-side menu or the [Go to] button in the detail area.
Roll back up to file # 1084 (the parent project). Now you can get to the owner Contact record by clicking [Go to] in the middle area in the “Owner info” on File # 1084.
Try that. It takes you back to the contact. You can then start the drill-down process again…
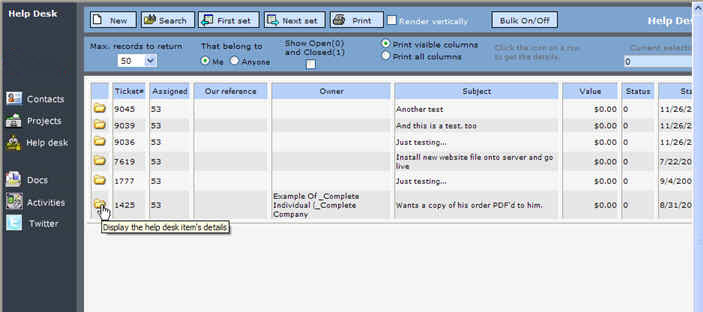
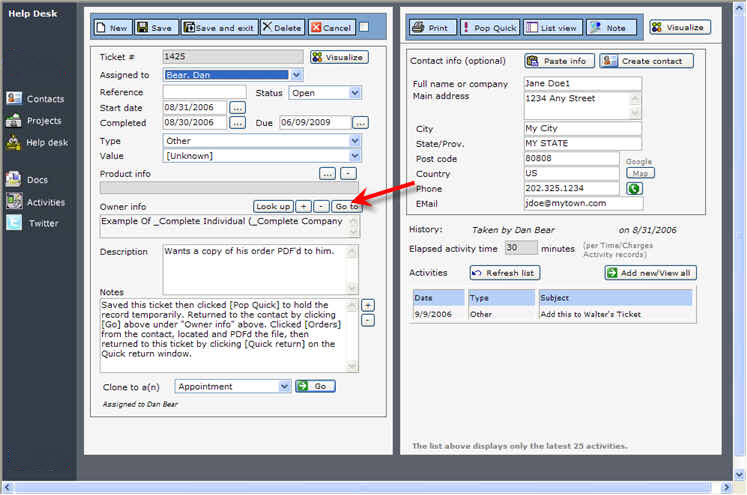
Help Desk
Used to track issues. Similar in functionality to Projects. The Help Desk module can be used for all kinds of required actions, from inbound customer enquiries to tech support handling as well as Call Center functions.
From the Home page, click [My modules] and ensure the checkbox for ‘Help desk’ is selected and that [Save module settings] has been clicked.
Click either [Help desk] or [Resources] then [Help desk] in the left-side menu or floating menu.
Help desk details:
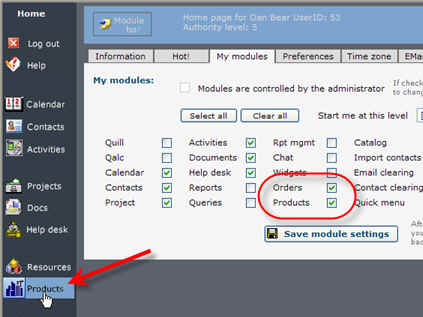
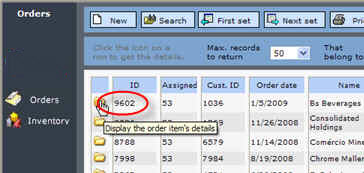
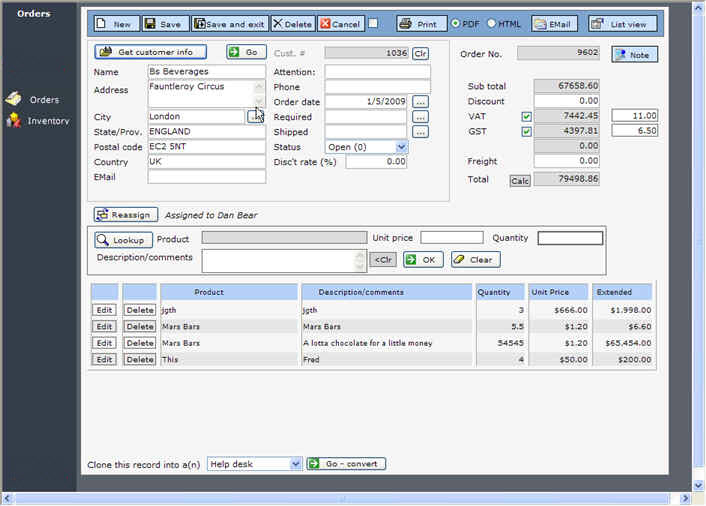
Orders
A complete order entry system, including Inventory listing and recording.
From the Home page, click [My modules] and ensure the checkboxes for ‘Orders’ and ‘Products’ (inventory) are selected and that [Save module settings] has been clicked.
From the Home page, click [Products] to display the Orders list view. Select an order and view its details.
You can see that the order entry system is quite comprehensive, including custom tax rates, selectable customers, line item overrides and more.
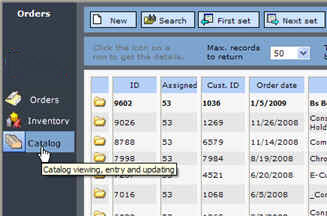
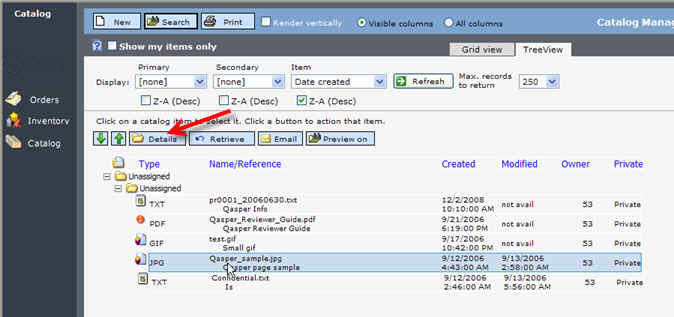
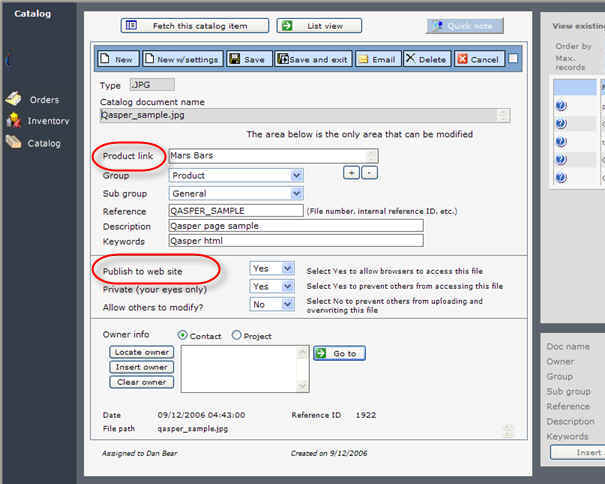
Catalog
This is another module that you can skip for now. It's very similar to Documents and is typically used by the sales team to store sales materials as well as to make them available to web browsing.So unless you're interested, skip right down to Calendaring and scheduling below.
From the Home page, click [My modules] and ensure the checkbox for ‘Catalog’ is selected and that [Save module settings] has been clicked.
From the Home page, click [Products] to display the Orders list view, then click [Catalog] to view the Catalog module.
Catalog is similar to Documents, but with twists that allow catalog items to be published for external browsing by customers, etc.
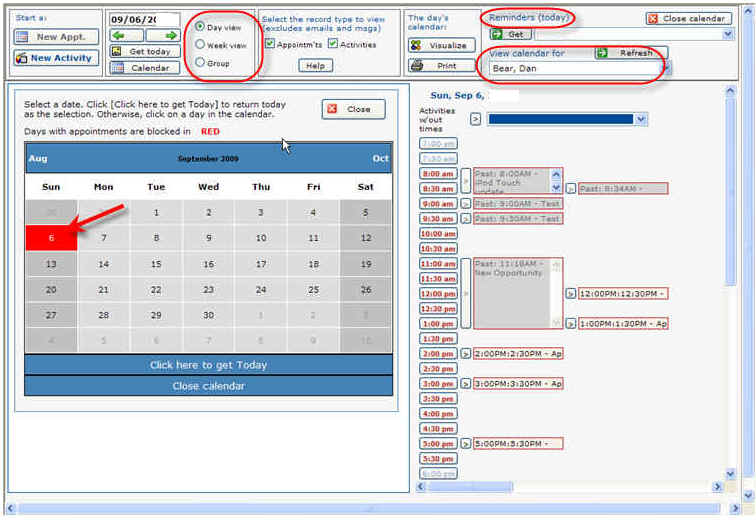
Calendaring and scheduling: (requires popups to be allowed)
From the Home page, click [Calendar] on the left-side menu, or the My Appointments button, or any individual appointment to bring up the Calendar and Activity manager:
The calendar provides month, week, group and day views and enables you to view others' calendars (where authorized). You can also view general activities that are both timed and untimed (none of those in the displayed image below, though).
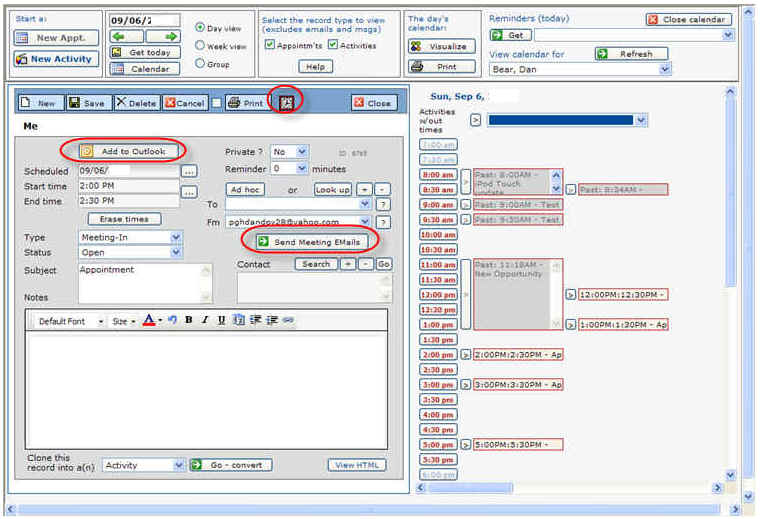
The appointment detail record is comprehensive, with reminders, time and charges tracking, add to Outlook, meeting emailing with response tracking, contact owner assignment, rich text editing, cloning and more.
Other quick look functions/modules:
From the Home page, click [My modules] then click [Select all] and [Save module settings]. That makes all the modules available. Cruise through some of them at your leisure.
There are a lot of additional features. A major feature is the online word processor, Quill (click the [Office] button from the left-side menu through Reports (have a look at the standards-based Custom query buider) to Widgets (try the Twitter search engine). Also, have a look at [Chat].
[Optional - Intermediate] Visualizer (requires popups to be allowed)
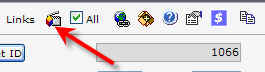
This is an excellent way to centrally view connected items and be able to see their details at a click.If your administrator has enabled the Visualizer, click [Visualize] from the Contact detail profile or [Click to visualize connections] from the Connections panel (if it’s open) to see the connections visually, with 2 layers of separation.
or
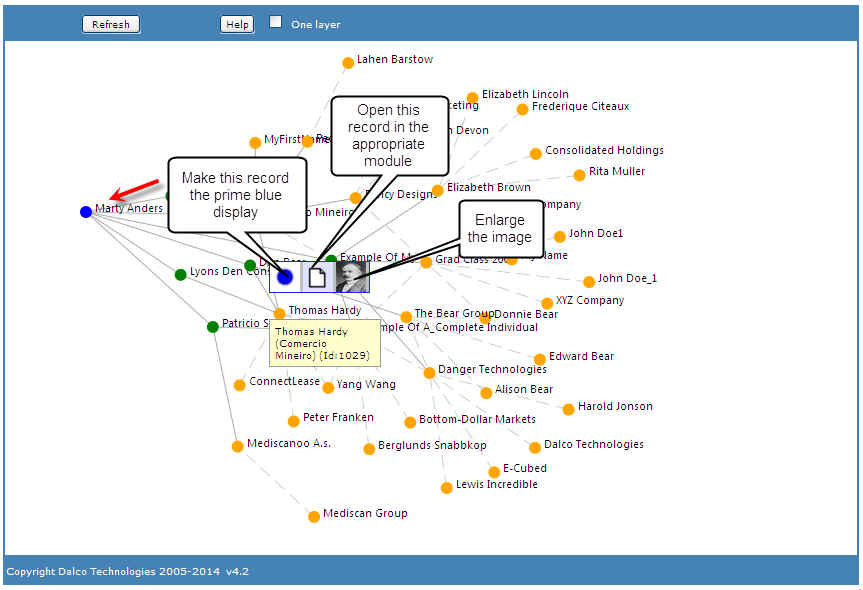
This will display the Data Visualizer, a node-based visual picture of your connections. The linked nodes display in the left-side work area, with text descriptions in a list down the right side. The first time you display the visualizer, it could take a few extra seconds to display.
Use the visualizer to walk through the network of linked contacts or to display groups of related records (like your ToDos).
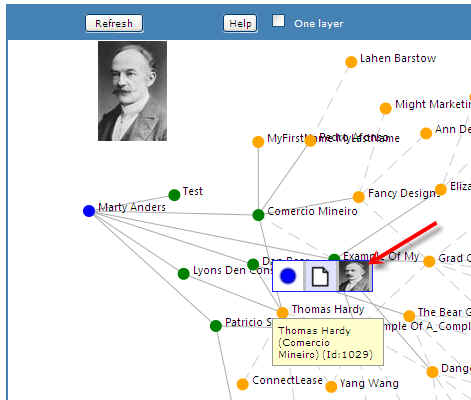
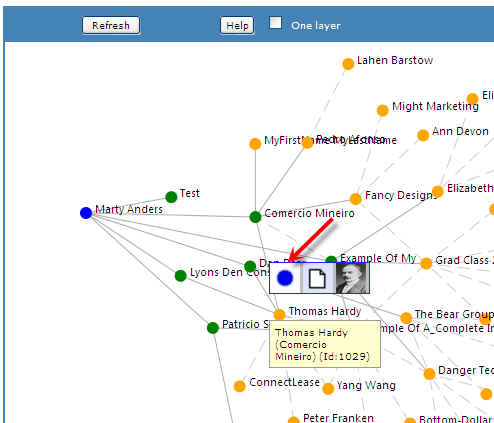
Mouse over (or touch) the nodes to highlight them and to display the option bar.
Click or touch the image to display a larger version.
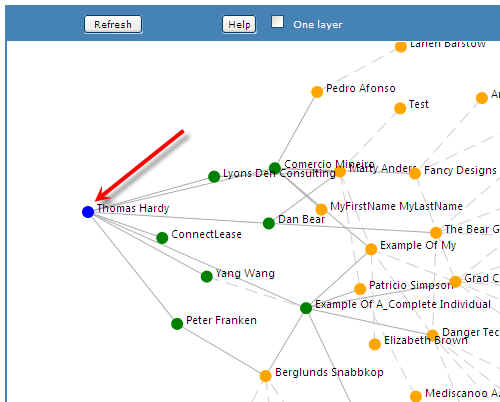
The prime node is blue, the first degree of separation is green and the second degree of separation is orange.
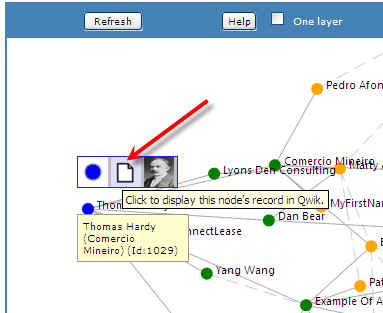
The solid lines are direct links between contacts. The dotted lines are indirect links. You can click and drag the nodes around the work area to better position them for viewing.Click the blue button in the option bar to make that record the prime node.
Click the white page in the option bar to display the record in its owner form.
You can visualize a variety of records: Contacts, opportunities, to dos, and more.


VI. Extended View - click here
VII. Some interesting features - click here