
IMPORTANT: Please also read Administrator - Getting Started. That page contains information vital to properly setting up and managing users.
|
Late additions (click here or scroll to bottom for details) The following functions/features were recently added/ updated to the administration function. |
Quick reference:
As the administrator, for most installations, all you need to do is add and manage users. Qwik is very versatile and customizable, but you can get to that stuff much later.
Administration
![]()
First, log in as administrator.
When first installed, Qwik's administration credentials are:
- User name: administrator
- User password: administrator
The password will require changing immediately, to prevent unauthorized access. Warnings will be issued by Qwik as needed.
Click the Administration icon from the main menu to display the Administration menu. Select the Administration icon from that menu to access the Administration module. If you not logged in as administrator, clicking this button will have no effect.
The administration module can be accessed only by the administrator or someone to whom the administrator has granted top level access. The user name for the administrator must always be administrator.
Use the Administration module to customize fields, lists and panels, and to change various settings, modify user profiles and merge contacts.
Administration
As administrator, you must change the default password for the administrator, so that others cannot access the administration module. The initial password is administrator.
To change the password, log in as administrator and go to the Admin module. Click [User profiles], locate the Administrator user in the list then click [Get the user].
Change the password to something fairly complex, not related to birthdays, license numbers and so on. It's best to use numbers and upper and lower case characters in the password, and to make it at least 8 characters in length.
Use the [Create] button to automatically create a strong password.
After changing the password, click [Save changes].
For detailed information click here.
[User profiles] tab
Control users' and resources' information through this section.
User administration
Start a new user
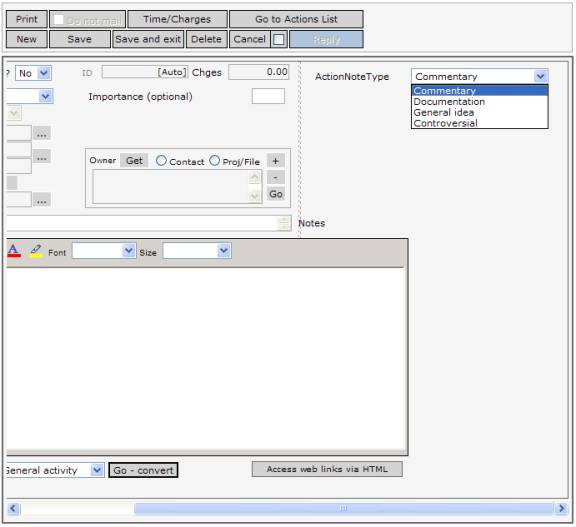
Click [New user].
Enter First name, Last name, User name, Password and Charge rate (if applicable).
Always click [Save changes] when you are finished. Otherwise, nothing will be saved.
If the password is not strong enough, an error message will display when you try to [Save changes].
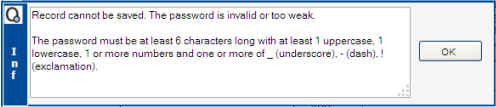
Qwik can automatically create a strong password - click [Create]. Click [Peek] to have a quick look at it.
See the image below for help.
Authority level
This level defines the ability of the user to access information. See here for more on this topic.
Add Email address
Always add at least one email address for the user. Enter the proposed email address in the 'EMail Addresses' box and click [Add above to list below] to add it.
The list may ultimately contain several email addresses since it's also used by QSync to determine which emails to synchronize into the Qwik central database. The user will decide which emails to include.
Have a look here for more information on that feature.
Every user has a Primary email address. It's the one at the top of the list.
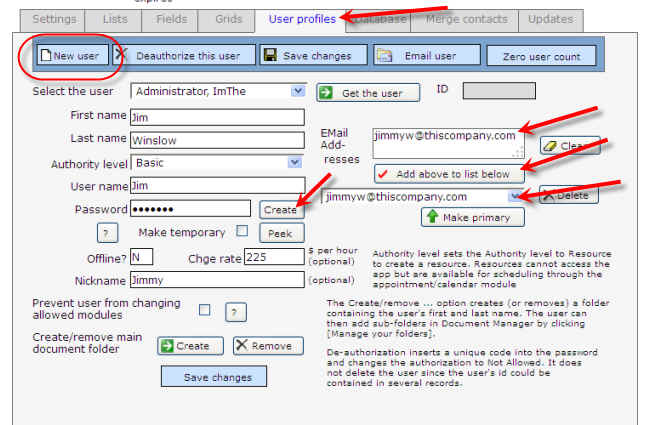
Remove a user by selecting a user, clicking [Get the user] then clicking [Deauthorize this user].
Prevent user from changing allowed modules [ ]
If this checkbox is selected, it prevents the user from changing any module selections in his/her Home page.
To restrict the user's access to the modules you want:
1. [Get the user] to display the user.
2. Uncheck this checkbox and [Save changes].
3. Log in using that user's log in credentials.
4. Go to the Home page and select [Preferences, My Modules and other settings] > [My modules].
5. Select the modules you want the user to have access to.
6. [Save module settings].
7. Log back in as administrator and return to the Admin module.
8. Select [User profiles].
9. Reselect the user.
10. Click this checkbox.
11. [Save changes].
Periodically, users will be advised that there are updates available and will request they contact the Administrator to download those updates.
1. Check for system updates:
This action will require everyone currently logged in to close down and restart, so it's best done after hours.
a. Enter your registration code and registration EMail address and click [Check for system updates].
b. Any new updates will be downloaded and installed automatically.
c. After this is done, close down and log in again.
Note: Performance will be a bit slower than normal as you move from module to module for the first time after updating, since a recompile of each module is needed to check for and reflect the updates.
2. Check local update files:
This action will check for any unapplied database definitions. Click [Check for database updates] to perform the check and have any new definitions applied.
[Settings] tab/Authority levels
Use the drop down list to select a setting. Enter the new value the the "Set the value" area. Click [Save settings] each time a value is changed.
Key settings:
Email path: the path name required by the host SMTP server.
Email name: the email name and address of the administrator.
StoreDocsAsFiles: designate whether documents are to be stored as files in a folder on the server or directly into the database as a field in a database record. If you are unsure, store the documents as files. Ensure a folder named documents exists in the web folder of the server.
Other settings are self-explanatory.
Authority levels. To restrict user access to higher levels, select these properties and set their value to Y:
- RestrictActivities
- RestrictContacts
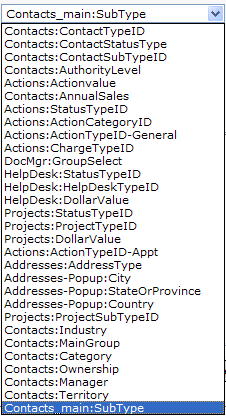
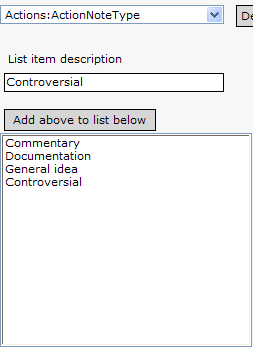
You can customize the contents of many of the dropdown lists in various modules. The list group displays as [module]:[field name]. For example, the actions category list might be:
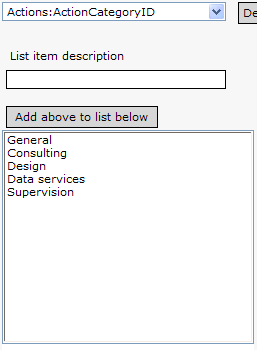
This corresponds to the Categories in Time and Charges:

Select a list group from the drop down list.
Click [Delete this item] to remove the list group and its list contents. Several list groups cannot be deleted. Several list groups mandate a minimum number entries. Several list groups mandate certain values in certain positions. Read the Notes section for more information.
Enter a value in the "List item description" box. Click [Add above to the list below] to add the value to the list.
Click on a value in the list. Click [Move up] to move it up in the list; [Move down] to move it down; [Remove] to delete it from the list.
Add or modify the Notes box by typing in reminder information.
Click [Update database] to save changes; [Cancel changes] to cancel changes.
Note: if you add a new custom field that is a list type, you should then return to this tab and populate the contents of the list.
Fields:
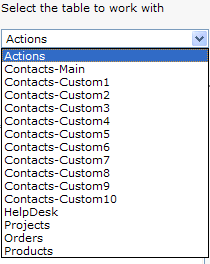
To customize fields, click the required table from the "Select the table to work with" drop down list. The "Available fields:" list will be automatically populated.
Contacts Table - If the table is Contacts, several custom areas will be available:
Contacts-Main: Choose this option to cause custom fields to be added to the main contact screen. In the following example, the fields "Spouse" and "Sub type" are custom fields and follow the standard fields on the contact form.
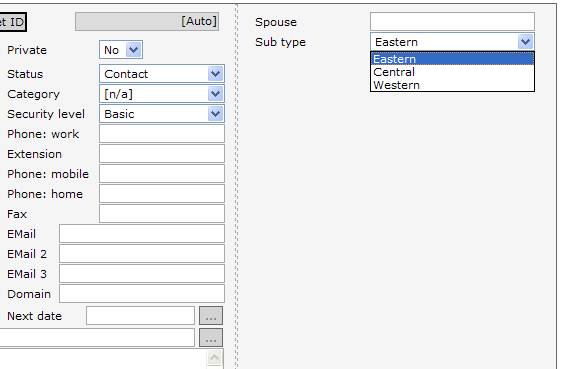
Note that "Sub type" is a drop down list. In the Lists tab the Administration module, the list is automatically added:
When selected, content can be added, like this:

Contacts-Custom1 through Contacts-Custom10: Choose one or more of these options to create custom groups that display in their own panel.
Select any option, add a Panel Label and fields to create a custom group of fields that display in their own panel.

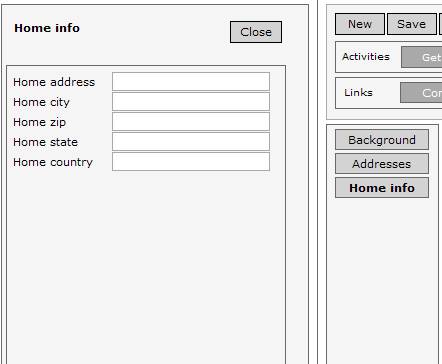
For example, in the above and following, Contacts-Custom1 has been customized to produce a group for Home information:
Reassign a custom Contacts field to a different group by selecting a new destination from the "Move this field to: " drop down list, then clicking [Save changes to this field]:
Other tables:
Selecting a table other than Contacts and creating custom fields will cause those custom fields to be added to the main screen of the applicable module. For example:
And:
Produces this result on the Actions form:
Field handling:
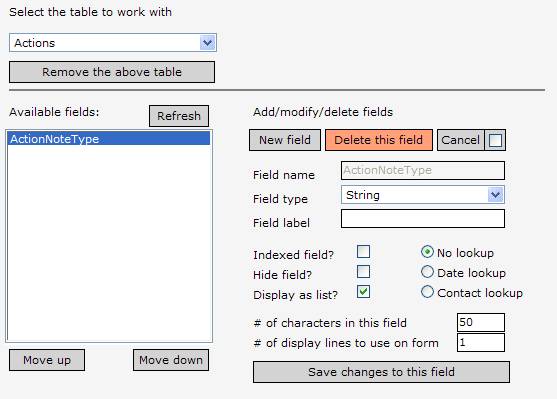
Click on a field in the "Available fields:" list.
Click [Move up] to move the field up in the list; [Move down] to move it down. Where the field is located in the list determines where it appears when the custom fields are displayed in the applicable module.
Add/modify/delete fields:
Click [New field] to begin a new field definition. If a field is selected in the "Available fields:" list, click [Delete this field] to delete it (action is irreversible). Click [Cancel] to cancel all changes, or click into the checkbox beside the [Cancel] button to have all changes automatically cancelled when the next action is taken.
Enter a "Field name". The name should be short and descriptive. Use upper and lower case to identify words within a field name. For example, "SpouseName". Note: spaces left between words will automatically be removed and each word will be capitalized. For example, if the field name is "spouse name", it will change to "SpouseName".
Select a "Field type" appropriate for the type of field you are defining.
Enter a "Field label" - the display name for the field.
Click the "Indexed field?" checkbox if the field is to be indexed.
Click the "Hide field?" checkbox if the field is not to be displayed.
Click the "Display as list?" checkbox if the field is to contain a list. After saving the field with this selection, click the [Manage lists] tab to select the field and enter list values.
Enter the "# of characters in this field" (expected size). This is required only if the Field type is "String".
Enter the "# of display lines to use on the form" (expected height). Where the field is a memo, it could contain several words and should have more height than a 1 line display has.
If the table is the Contacts table, a "Move this field to: " drop down list will display. Select from the list and click [Save changes to this field] to move the field to a different custom Contacts group.
Click [Save changes to this field] to save the changes.
The Grids section allows you to change the left to right order and column name of columns in various grids (list views, like those in the Activities module), set justification, width and to show or hide them.
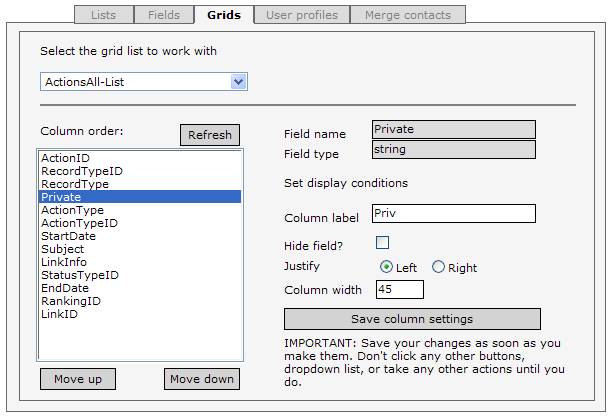
Click on a column name in the list and click [Move up] and [Move down] to change the display order.
Use the drop down list to select a column. Enter a column name in the "Column label" area, and select the settings you require.
Always click [Save column settings] whenever you make a column change.
[Merge contacts] tab
Merge one contact and all related records into another contact.
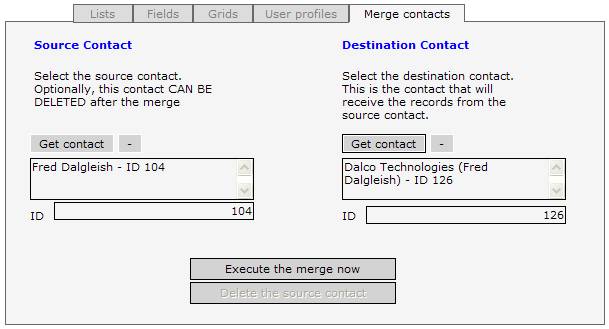
Use this section to perform contact merges. For example, a duplicate contact may have been set up, along with Connection, Action, Help Desk, Document, Orders and Project records and it is required that the contact be merged with another contact.
The merge will reassign the aforementioned records to the designated contact.
Note: the merger will NOT merge any fields from the source contact record into the target contact record. It only merges the specific aforementioned records. If there is field information on the source contact that you require on the target contact, use the Memorize and Paste function (click the [Paste memorized] button in that function) in the Contacts module to move the information before carrying out the merge.
[Database] tab
Managing your database. You should periodically back up your running database. Each backup creates a folder on the hosting server with an XML folder and several industry-standard XML files for the various tables.
Each backup is uniquely dated.
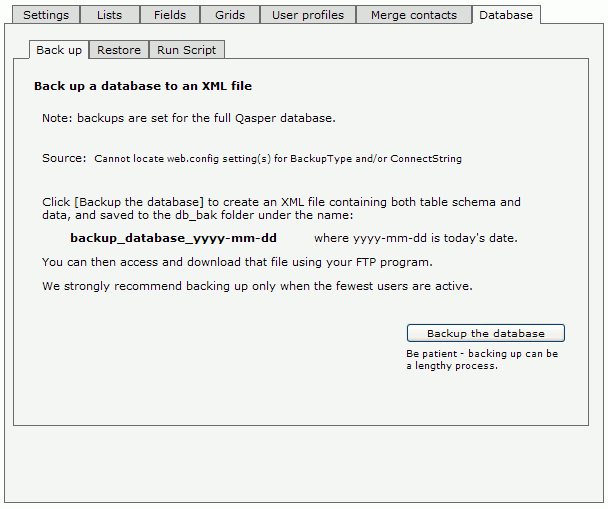
[Back up] tab
Click [Back up] to have your database backed up as an industry-standard XML file, including schema. The file is saved to the db_bak folder with the name backup_database_yyyy-mm-dd.XML where "yyyy-mm-dd" is today's date.
You can then access the db_bak folder to copy the file to a secure offsite location. Use an FTP program like http://www.smartftp.com for this purpose.
The file can also be used in the Restore process.
[Restore] tab
Restoring a database should be done only by a database expert.
Restoring an XML file to a database requires both an XML backup file (created in the [Backup] tab explanation above) and a target database.
Target database:
Typically, the target database is the current database that may have become corrupted, but it could be a different one if you are moving your installation to another host. For example, you could backup to the XML files, then move those XML files to a new location, and restore to a new database at that location.
The target database must be resident on your hosted server (either self-hosted or ISP-hosted).
Procedure:
1. The drop-down list displays:
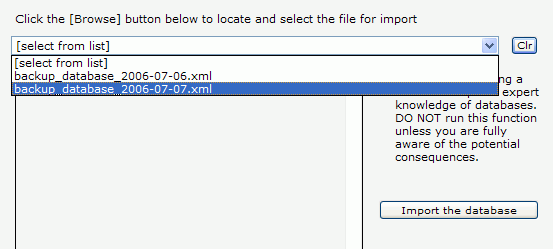
2. Select the applicable XML file and click [Import the database]. Restoring can take some time, particularly if you are restoring into an Access database, so be patient.
[Run Script] tab
Running a script should be done only by a database expert.
Use this section to select a script (a file with the extension .SQL) and run it against the target database.